
Nail Art
Valentine’s Day Stamped Nails Two Ways
The wonderful thing about Valentine’s Day is that it celebrates Love! Love comes in so many shapes! There’s something that defines Love, regardless of its gazillion manifestations: it comes in twos! If it takes two to tango, well, it definitely takes two to love!
Our resident stamping specialist, Sasha, my absolute Stamping Idol has a surprise for Valentine’s day! Two Valentine’s Day Manis! I admit I talked about some nail art ideas with her, for Vday, but as always, she’s completely free to choose and style the manis she wants. She has an amazing approach to stamping and I love everything about it! Love these Valentine’s Day Nail Art ideas! I hope you will too!

Hi there stamping lovers! This time I have two designs for you. The tutorials will be relatively short and really tot he point. My husband is flying to China for his work in the morning (yes, he’s flying on Valentine’s Day…..), so I want to spend some time with him. Therefore, with further ado, let’s get on with the step by step tutorials of my manis!
See also: These gorgeous Graffiti Valentine’s Day Nails!
With Valentine’s Day around the corner, we talked about some nail art ideas and what stood out was an “edgy” Valentine’s Day mani suggestion. I happen to love edgy manis, so I was thrilled with this “assignment” lol.

Because I assume that by now, you all now the drill about the basis items we need for manis, I decided to just list some specific items for this very mani: light and dark grey polish, light and dark grey stamping polish, an image plate of a “written” letter and an image of skulls with roses.
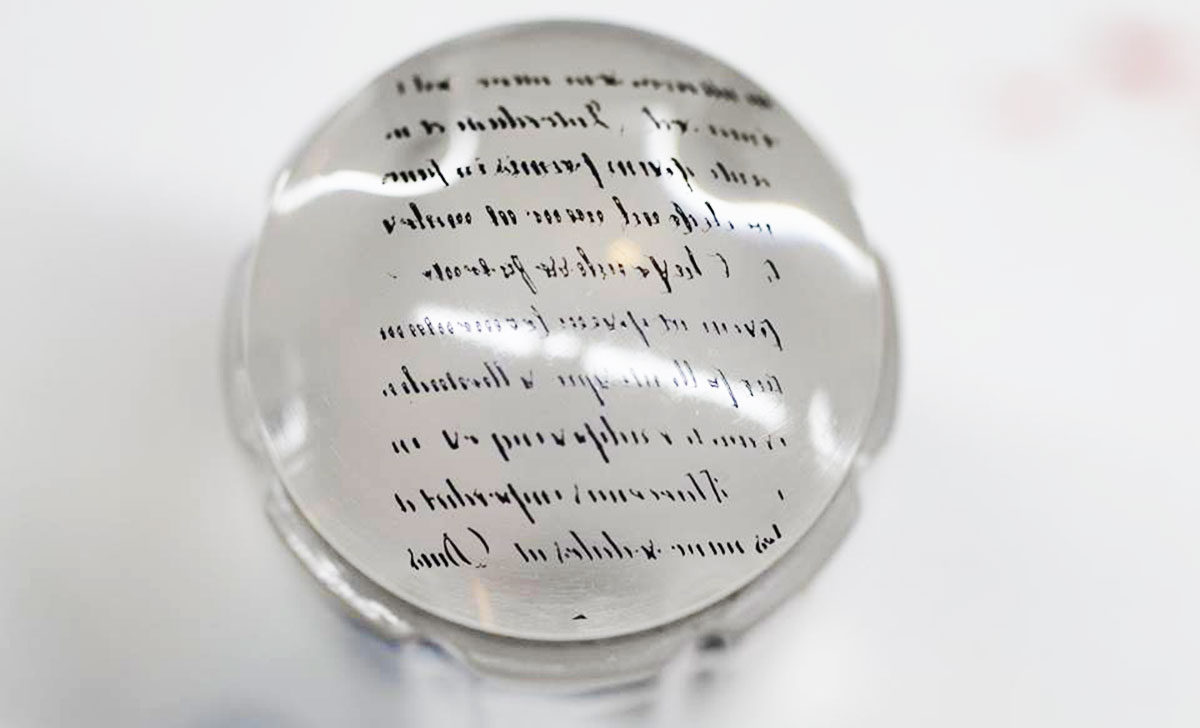
Now let’s start: as you can see above, I applied my base coat and when that was dry, I applied my base colors; light grey on all of my nails, with darker grey on the accent nail (both are somewhat “lilac-y”, from the A England’s To Emily Bronte collection), top coated it with a quick drying top coat and began to prepare my accent image.
Aren’t these: Ragdoll Stamped Nails Spectacular?
I transferred the skulls with roses onto a stamper head, top coated it and let dry (as seen above). Meanwhile I put some liquid latex around the nails to protect te cuticle area when stamping. To stick with my chosen ‘edgy’ theme, I used black latex ;-)
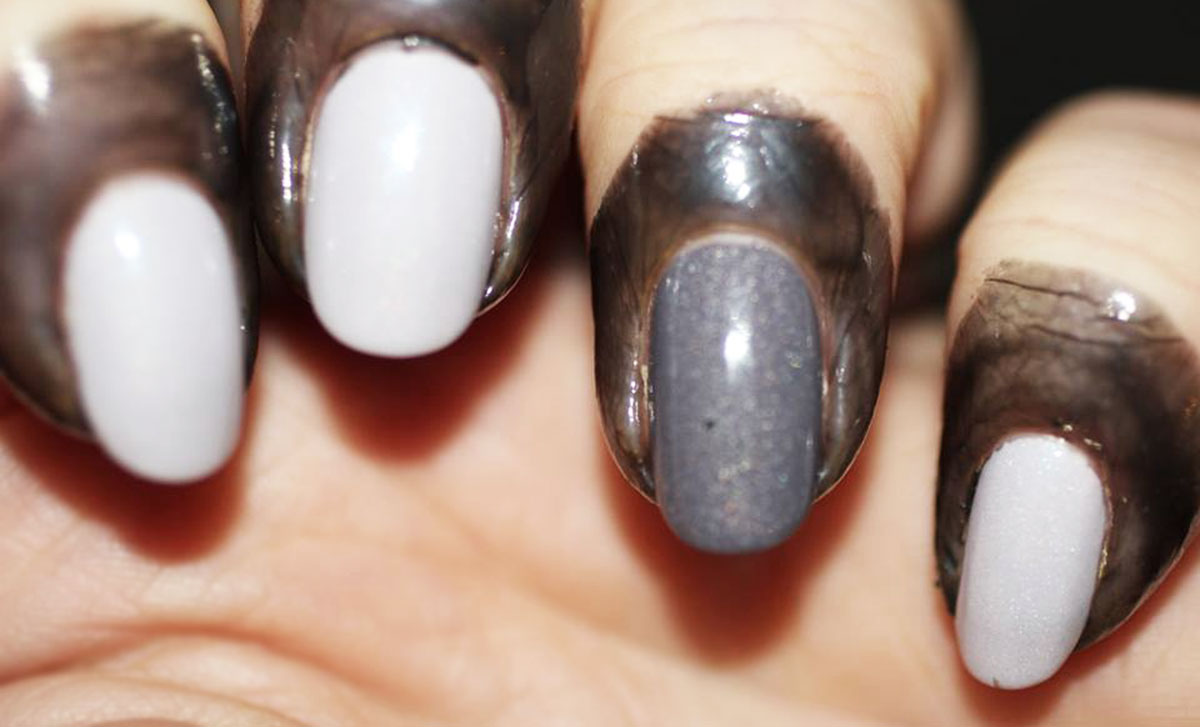
Then I colored in my skulls and roses; I obviously used white and red. Let that dry too, while I stamped my “basic image” on all of my nails, in dark grey on the accent nail and in light grey on the other nails. After this step I removed the latex barrier from my fingers. Of course you could top coat it and leave it like this, because this is an awesome effect by itself! But, let’s be honest, there’s nothing edgy about some letters on the nails, is there? So I applied some nail art transfer foil glue on my accent nail and let that dry for the finishing stamping step.

You need to see: These fabulous black lace stamped nails!
With tweezers, I gently picked up the image from the stamper and laid it flat on my clear stamper (using the clear stamper is perfect for positioning precisely!) and transferred it onto my accent nail. I made sure the self-made decal sticked to my nail and I topped it all off with a nice thick layer of a glossy top coat. No need to say that I attended some cuticle care afterwards and tadaa!
Especially for Cecilia, I mattified it all to get another effect. I think it is a soft, yet edgy mani, what do you think??

Because edgy is not everyone’s cup of tea, I also decided to do a soft, sweet, kinda vintage looking V-day’s mani.
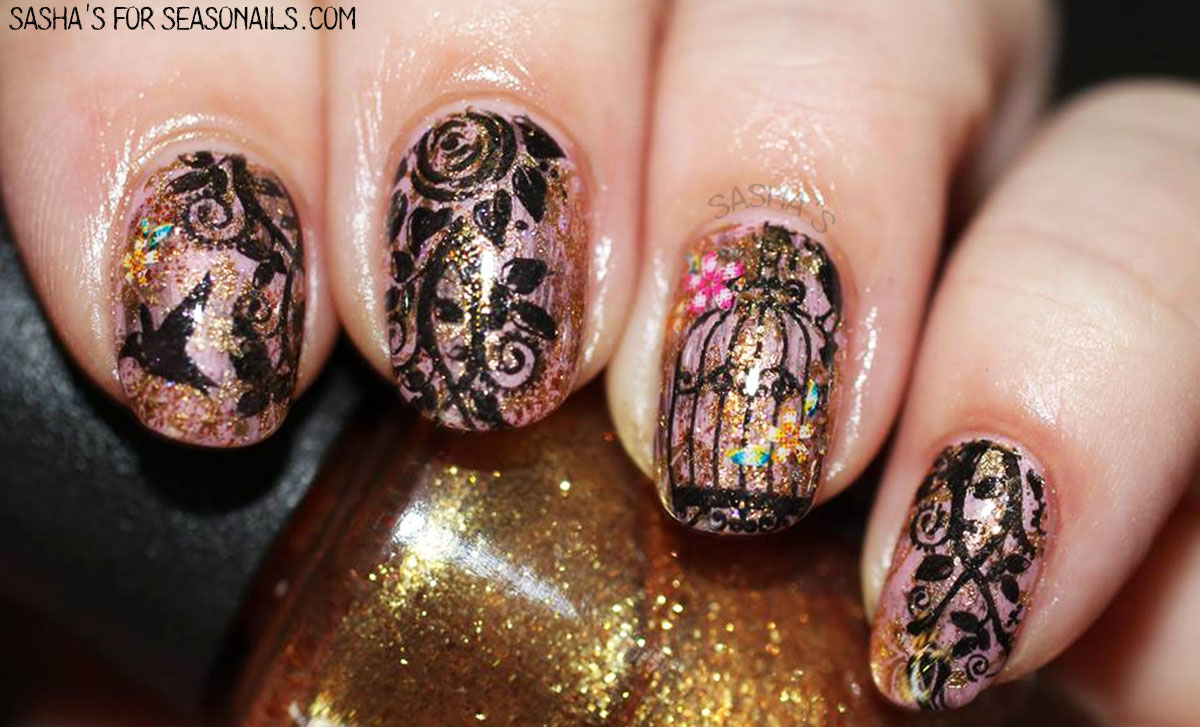
Besides the basics, I used light pink, holo glitter topper, charcoal polish, a gold flakie polish, a gold glass fleck polish, gold stamping polish, black glitter stamping polish, a vintage-y image and some bird / bird cage / flowery images and lastly some tiny colorful flower stickers.
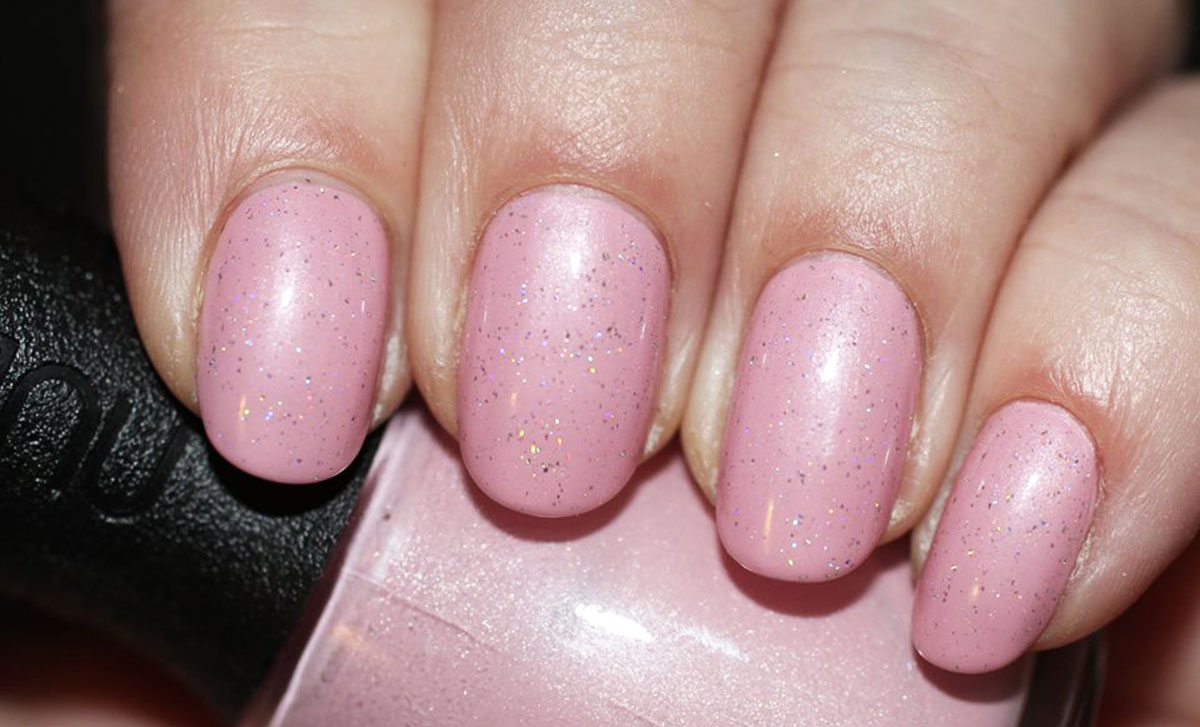
Firstly, of course, I applied a base coat, let that dry and applied my light pink polish. I topped it off with my favorite polish ever, a silver holo micro flakie polish and top coated it. When fully dry, I added a very thin layer of a gold flakie polish and after that, a dry brush with black nail polish.

Using pink liquid latex on the cuticle area to keep stamping polish off of my skin (yeah, I know, pink latex, isn’t that cute???), I had to let it dry and stamped some gorgeous, vintage-looking image on all of my nails in gold. Then I stamped all my nails in black with different bits of the part of the image plate I chose; one bird cage, one bird, one sun flower with leaves and vines and so on.
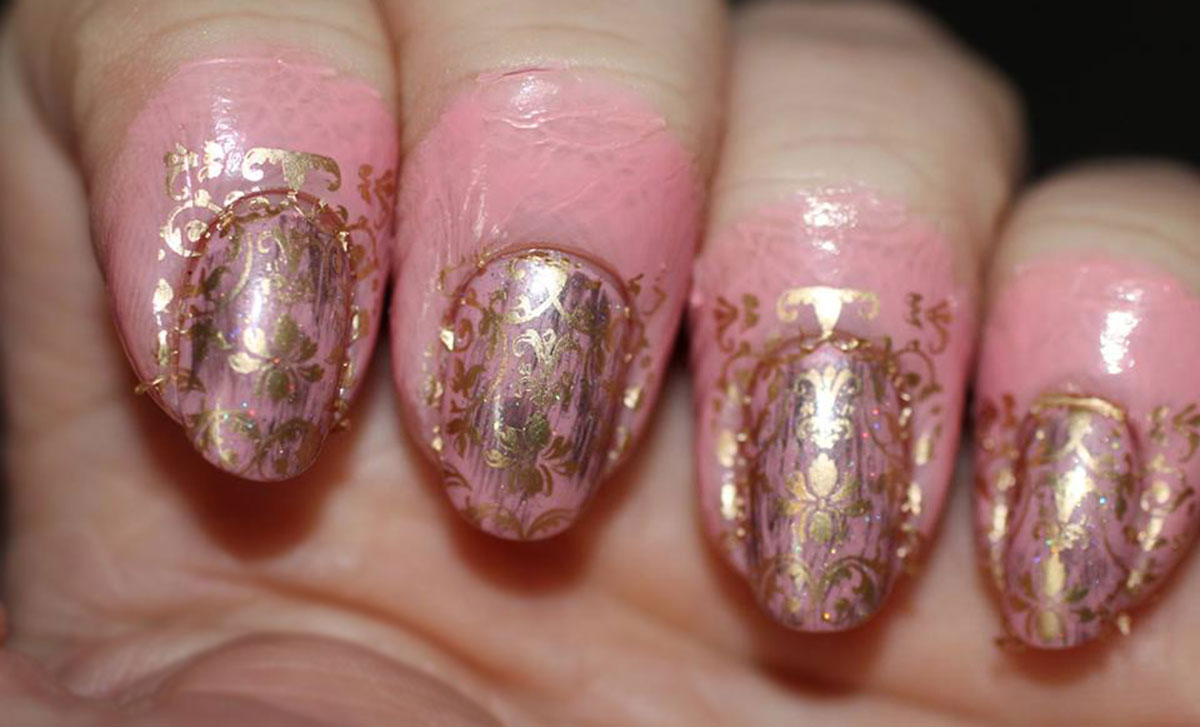
After all the stamping, I took the latex off, cleaned the tiny bits where needed and grabbed my tweezers and stickers. I placed some of the flower stickers here and there on my nails to complete the vintage look, I – almost randomly – applied some of the gold glass fleck on top of some parts of the nails to get the real antique feel and to make it an even more coherent as a whole.

I top coated it all with a nice, thick, glossy layer of quick drying top coat, too care of my cuticles and these vintage-y V-Day’s nails were a fact!
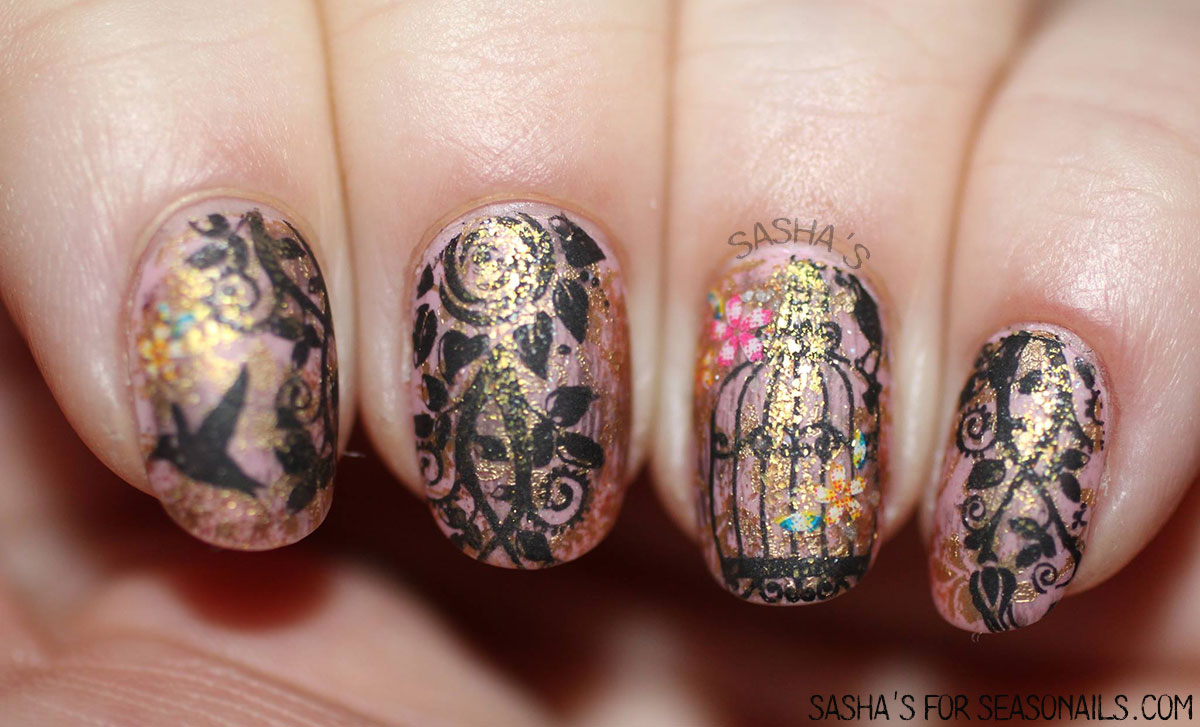
I thought of mattifying these because I know someone who will be loving them even more that way, but I decided to don’t do that just yet, because I love these nails so much, I want to keep them for some time. And because I happen to loooooooove glossy nails instead of matte, I keep them glossy for now!
Now I’m off to some lovely Italian restaurant downtown with my love, to have an early little Valentine’s Day ;-) I hope you all will have a lovely and lovable V-Day, with a just as lovely man ito go with it. Liefs, Sasha!
Awww! I hope you had a perfect early Valentine’s Day Sasha! It sure was a treat to receive these manis from you, and have them as a couple it feels like a Vday gift for me ^_^ and all the nail art lovers out there! And how amazing was that? To have them in matte for me? I was floored! Thank you! You’re amazing, as always! You can keep up with Sasha’s wonderful stamping by visiting her Facebook page!


Latest Comments