
Nail Art
Fabulous Black Lace Nails
I know you’re already used to reading Sasha’s Stamping column here on Seasonails, but I had to say something before introducing this particular nail art! It’s the most beautiful stamping mani I’ve seen and by far my absolute favorite!
Now that I got that off my chest, I’ll leave it to Sasha, our Stamping specialist who’s trying her new macro lense!
Hi there my dear fellow nail art addicts,
First of all, I wish you all the best for 2015 and I hope that this year will be full of joy, love, health, fun and nail art!
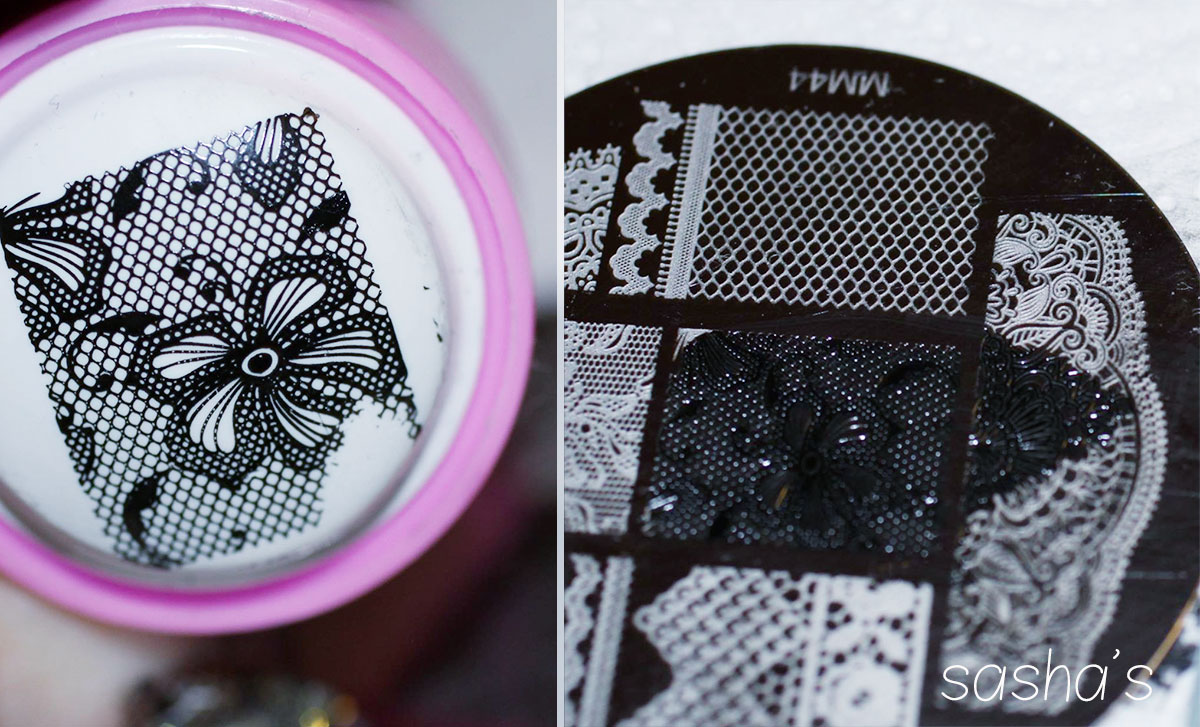
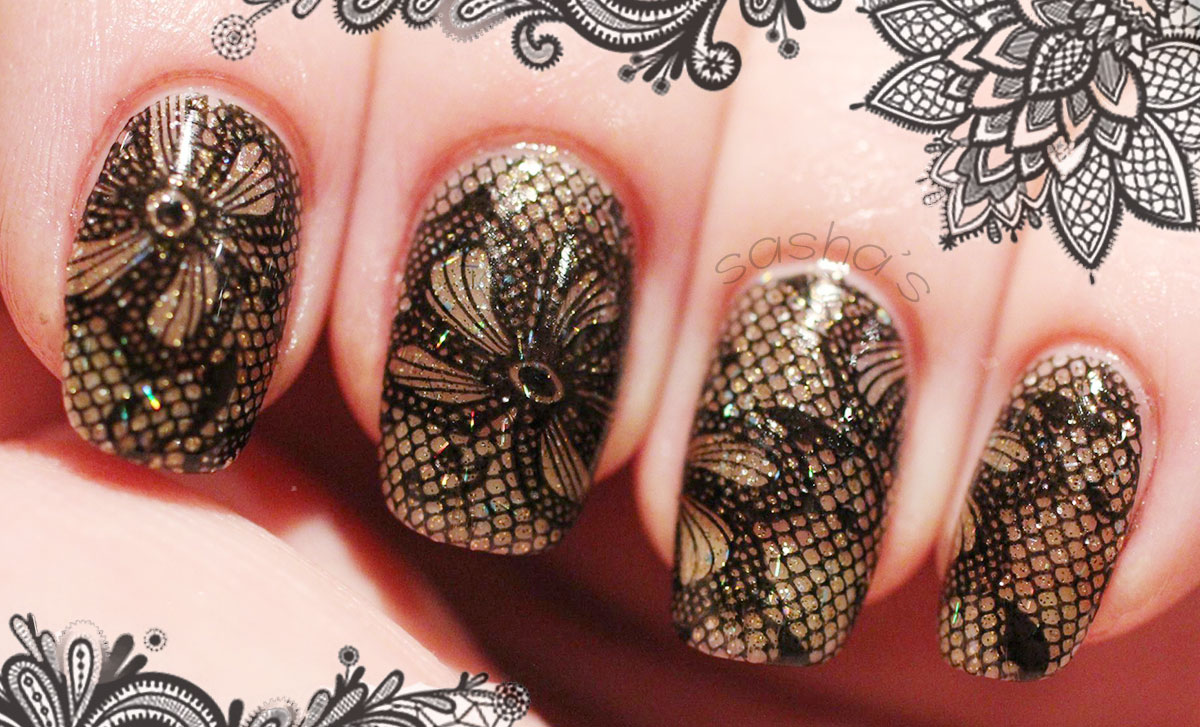
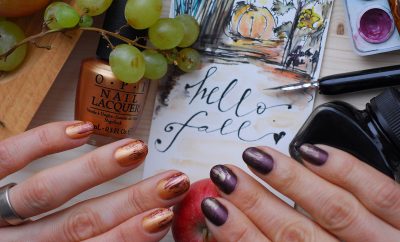
You couldn’t catch me in a happier mood than I’m in right now….. For over six months, I wanted to get my hands on a particular stamping image plate and I finally did! I absolutely love lace manis and Messy Mansion produced a very gorgeous plate with several different, but all equally fabulous, detailed and intricate lace images. So when the envelope with this beauty arrived, I grabbed my stuff and got started, litterally immediately! Although the result looks very intricate, this is actually a very, very easy to do mani, so let’s go!
See also: Sasha’s beautiful stamped Sunset!
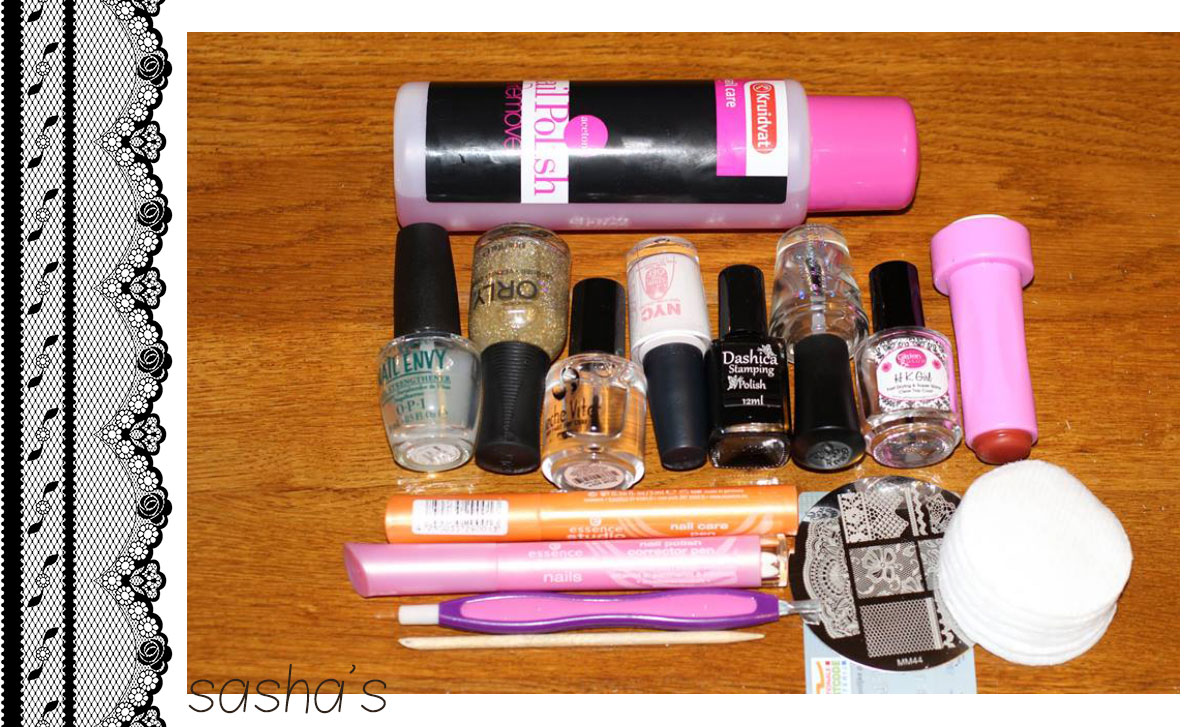
For this look, I used cotton pads, nailpolish remover, cuticle pusher, orangewood stick, nail polish remover corrector pen, base coat, gold holo glitter polish, peel off base for glitter, stamping plate (MM44), stamper, scraper (in this case I used an old store card), black stamping polish, special stamping top coat, fast drying top coat, cuticle oil pen. And of course my brand new camera with macro lense!
First of all, I made sure that every bit of nail polish from my previous mani was gone and my nails were free from any natural oils (oils prevent polish from adhering to the nails). I did that with a cotton pad soaked with nail polish remover (I like to use the one with acetone, because it works faster and better than the non acetone one). I pushed back my cuticles with a soft, rubbery cuticle pusher and removed the dead skin cells that were left on the nail bed. I allways remove those (not the cuticles!) because when they’re left on the nails, the mani won’t be neat and the polish can lift in these spots. Then I applied my base coat (allways use base coat for the protection of your natural nails and for the adhesion of the polish, thus wearability of your mani!) and let that dry.
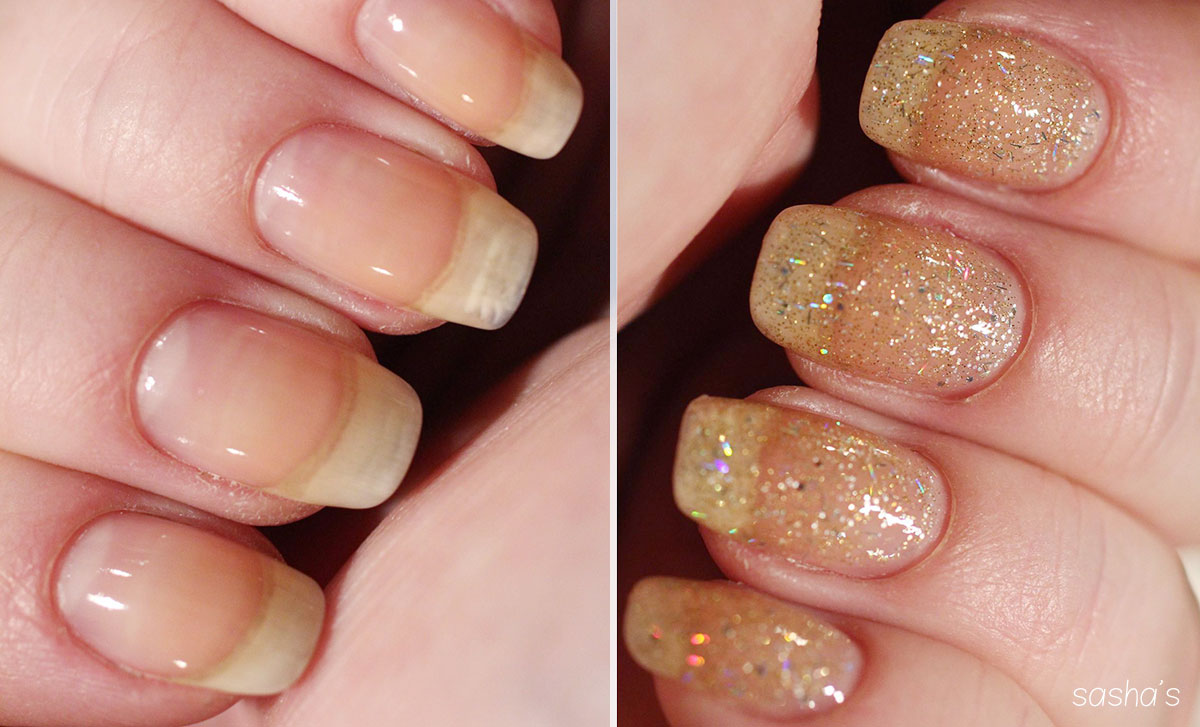
When the base was dry, I applied two coats of a gold holo glitter polish, topped it off with a fast drying topcoat and waited for some time to let it dry (it’s wise to use this kind of top coats before stamping. The chance of smudging the base polish is reduced to none this way).
See also: Fashion nails inspired by Dior!
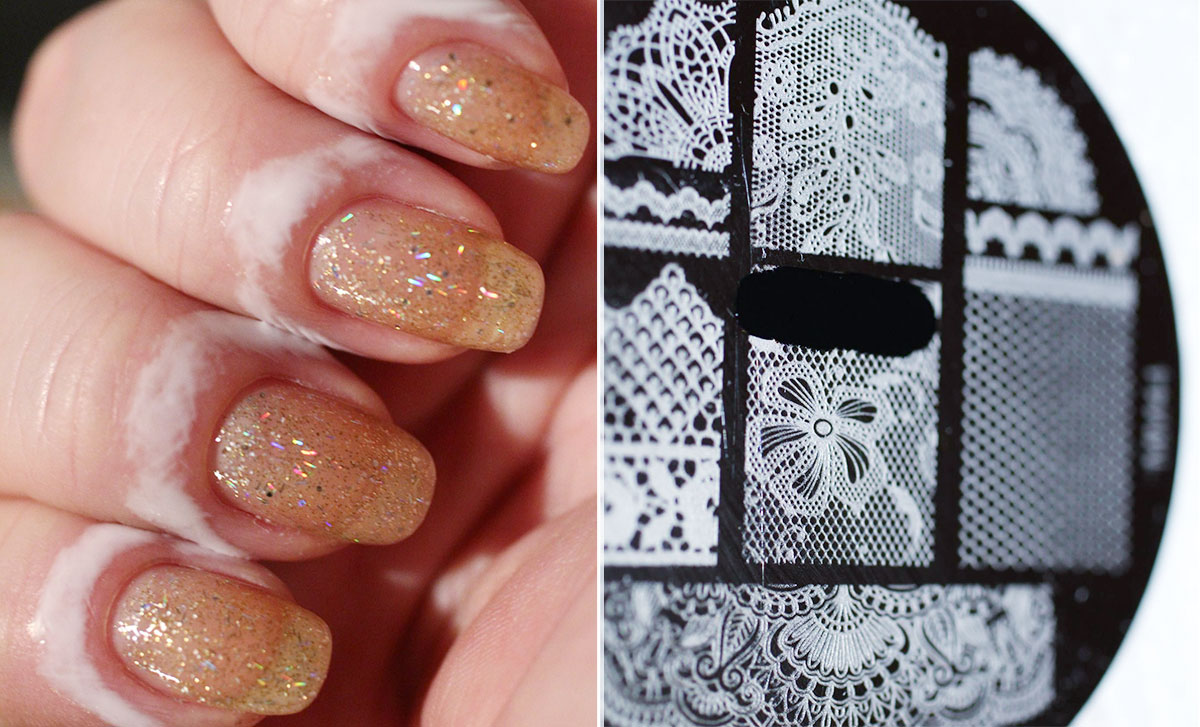
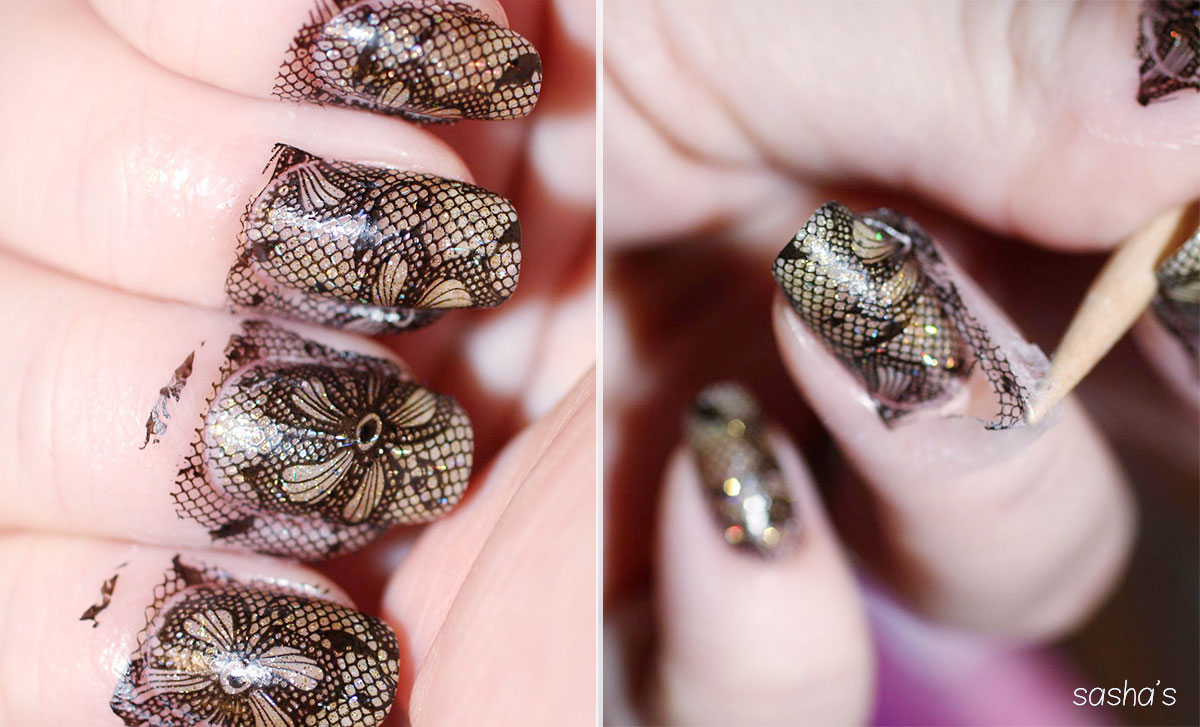
Then I put some peel off base for glitter around my nails on the cuticle area. This reduces the clean up, because full nail stamping will get messy!! When the peel off base for glitter was drying, it took a little while, so I was sure the glitter and top coat were dry enough to stamp onto anyway.
And now the first fun part: STAMPING!
First I cleaned my plate (yes, it is new, but I allways clean my stamping stuff before stamping, every single time), scraper and stamper with a cotton pad soaked in acetone-based nail polish remover. Then I put just a little bit of the black stamping polish on top of the image, scraped it over the entire image and transferred it to the stamper. I stamped the entire image on my nail.
You can either push your nail into the stamper (when you have a soft, squishy stamper like I love to use) or roll it onto your nails, from side to side. It’s a matter of preference, really. When the image was stamped onto all off my nails, I removed the peel off base and cleaned the tiny bit of polish that was left in the area between the polished nail and the cuticle with my nail polish remover corrector pen. I really like to use that, because it has a narrow tip and it allows me to work very precisely. You can also use a fine brush for this, dipped in acetone. This way I’m able to get an even and neat edge near the cuticles. When everything was all clean, I topped this off with my Konad’s special top coat for stamping, because I didn’t want this intricate design to smear (top coats can really do that).
Then I moved on to the second fun part: FINAL TOP COAT!
I applied a nice thick layer of my fast drying top coat. I really love it how that makes the glitter and the stamped images stand out, so that’s why I think applying high gloss top coat is such a fun part of doing a mani!! It’s like putting water or a piece of glass over your nails…..
The last step was to use my cuticle oil pen to pamper my poor cuticles and my desired lace mani was a fact. Can you understand my joy?
I hope you enjoyed this Sunday Stamping, I sure did!
Liefs,
Sasha
P.S. Whenever you think I wasn’t very clear in my step by step, or when you have questions about what I did, why I did it or how I did it, don’t hesitate to leave a comment or question and I will get to that.
See also: Movie inspired nails – Penguins of Madagascar!
Thank you, Sasha! I’m so happy you walked us through the most amazing lace mani! It’s perfect for any occasion, season or age! More so since Valentine’s Day is right around the corner! You can keep up with Sasha’s wonderful stamping by visiting her Facebook page!


Latest Comments